
Business Profiles
Managing Business Profiles in TEQ
The Business Profile function allows you to manage multiple brands, billing profiles, and organizational structures within a single TEQ instance. Each Business Profile operates independently, ensuring clear separation across financial data, branding, and communication.
Business Profiles can include:
- Separate billing profiles
- Independent departments and garages
- Customized branding, emails, and templates
This setup gives companies with multiple brands or sub-organizations full flexibility and control.
How Business Profiles Work
Business Profiles follow a hierarchical structure:
- Main Business Profile / Company
↳ Departments
↳ Garages
↳ Additional Business Profiles (each with their own departments and garages)
Each Business Profile includes its own:
- Billing profile
- Branding & email templates
- Query forms
- Accounting settings
💡 Tip: All email templates, PDFs, and pages can be customized individually per Business Profile.
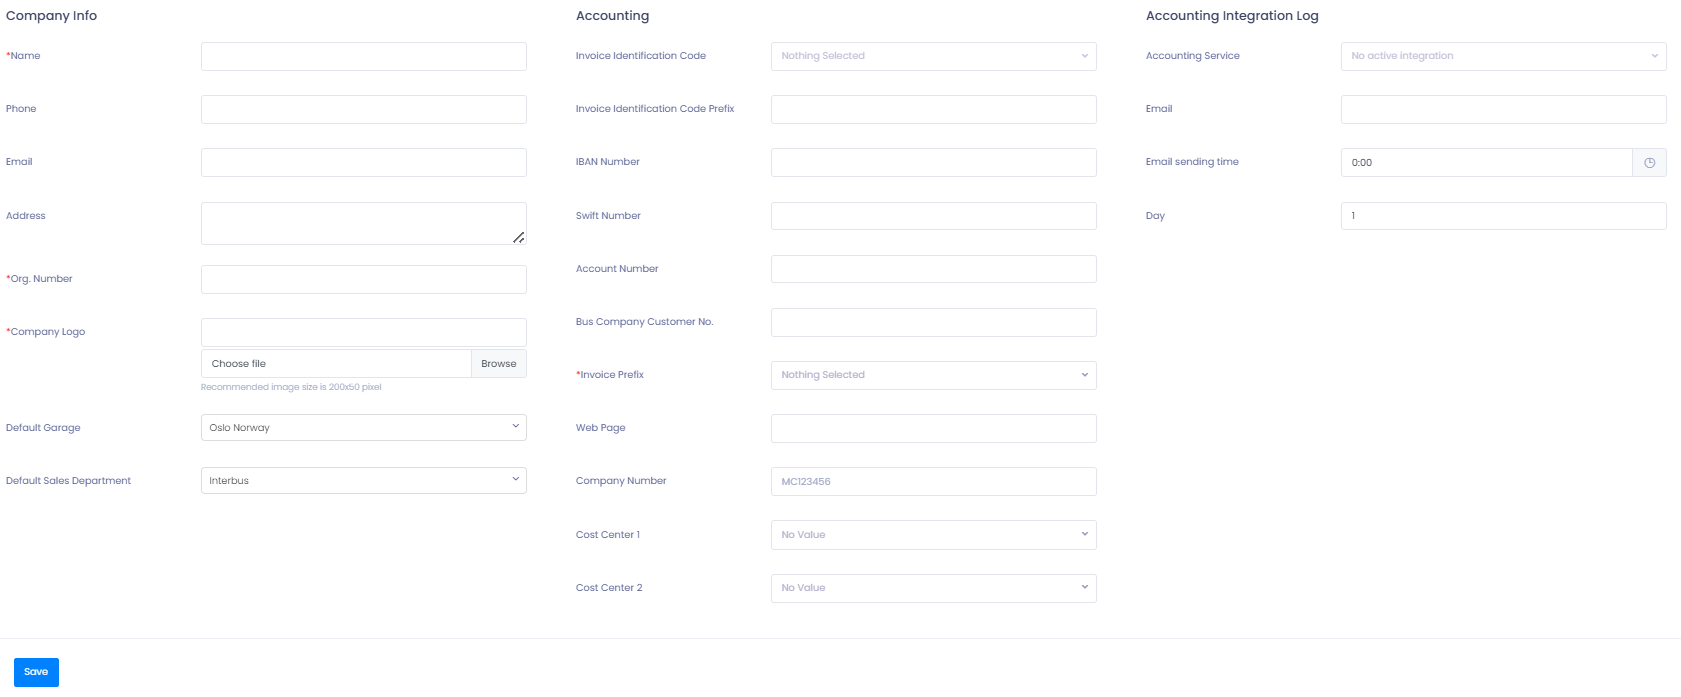
Step 1: Create a New Business Profile
- Go to Settings → Company → Billing Profile.
- Click ➕ Create Business Profile.
- Fill in all required company information:
- 🏢 Organisation number
- 📑 Accounting details
- 📋 Additional mandatory fields
- Choose the default garage and default sales department.
- These will appear automatically when creating new orders.
💡 Related Article: Departments & Garages – how to create and manage them.
Step 2: Customize Each Business Profile
Each Business Profile can have its own:
- Email templates (quotation, confirmation, invoice, etc.)
- Logo, colors, and global content
- PDF and page layouts
- CSS styling for query forms
Go to Settings → Company → Billing Profile → Customize Templates
to adjust branding per profile.

Step 3: Using Business Profiles in Quotations
When creating a quotation:
- Select the correct Business Profile from the Department dropdown.
- All branding (logo, sender info, templates) will match the selected profile.
💡 If the quotation comes from a public query form, TEQ automatically applies the correct Business Profile based on the department ID in the form URL.
Department ID Setup
To link a query form to a specific Business Profile:
- Go to Settings → Company → Organisation.
- Click Edit on the department.
- The URL will show the Department ID:
company.ferdia.app/public/query-form/?department=DEP123
- Use that ID in your query form embed.
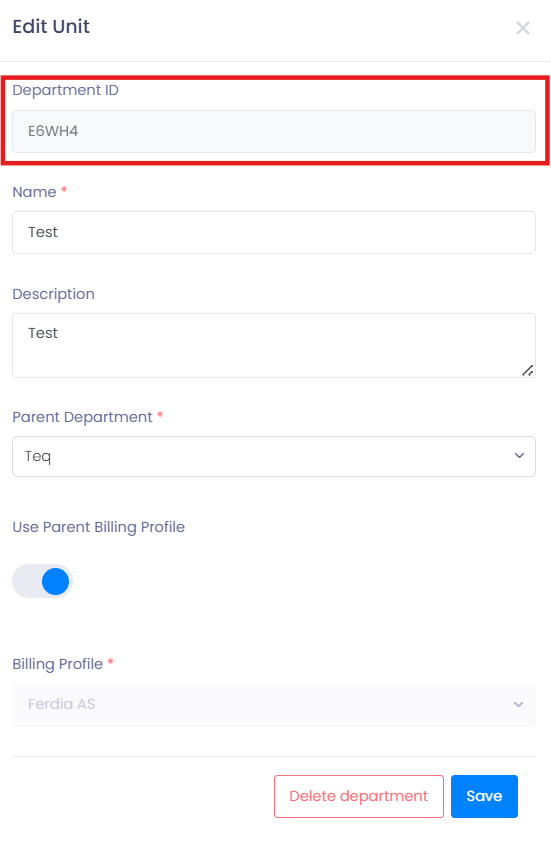
Multiple query forms can exist per Business Profile, each styled separately.
Step 4: Business Profiles in Invoicing
Business Profiles apply throughout the entire order workflow:
- The selected Business Profile follows the order from quotation → planning → invoicing.
- All invoices include the Business Profile’s:
- Accounting information
- Contact details
- Branding
Before sending an invoice, always verify:
- Correct Business Profile
- Correct department
- Correct billing profile
🛠 Troubleshooting
Business Profile not visible when creating quotations
- Ensure the department is linked to the correct Business Profile.
- Check user role permissions for access to departments and billing profiles.
Incorrect branding on customer emails
- Confirm you are editing the templates under the correct Business Profile.
- Check if a query form is linked to the correct Department ID.
Invoices showing wrong company information
- Verify the order is assigned to the correct Business Profile.
- Check the billing profile accounting settings for missing fields.
Query form showing wrong colors or styling
- Confirm the correct CSS file is uploaded under that Business Profile.
- Clear browser cache and reload the form.
Still having trouble?
- Contact TEQ Support and include Business Profile name, Department ID, and example Order/Quotation ID for faster assistance.