
How to create a Public API client in TEQ
The Public API uses OAuth 2.0 with the Client Credentials flow. Only registered clients can authenticate, so TEQ knows which applications are connecting.
Create a client in these cases:
- You are building a custom application for internal use that uses TEQ data or functionality.
- You are building an application that other TEQ companies will also use.
Each application needs its own client.
Before you start
Situation | What happens after you create the client |
|---|---|
The application uses your own company’s data | Your own company must also link the client. Creating it is not enough |
The application is used by other TEQ companies | Share the Client ID with each company. Each company links the client in its own TEQ |
Your user role needs access to the features Integrations and Public API Page. Without both, the Public API Clients tab is not available.
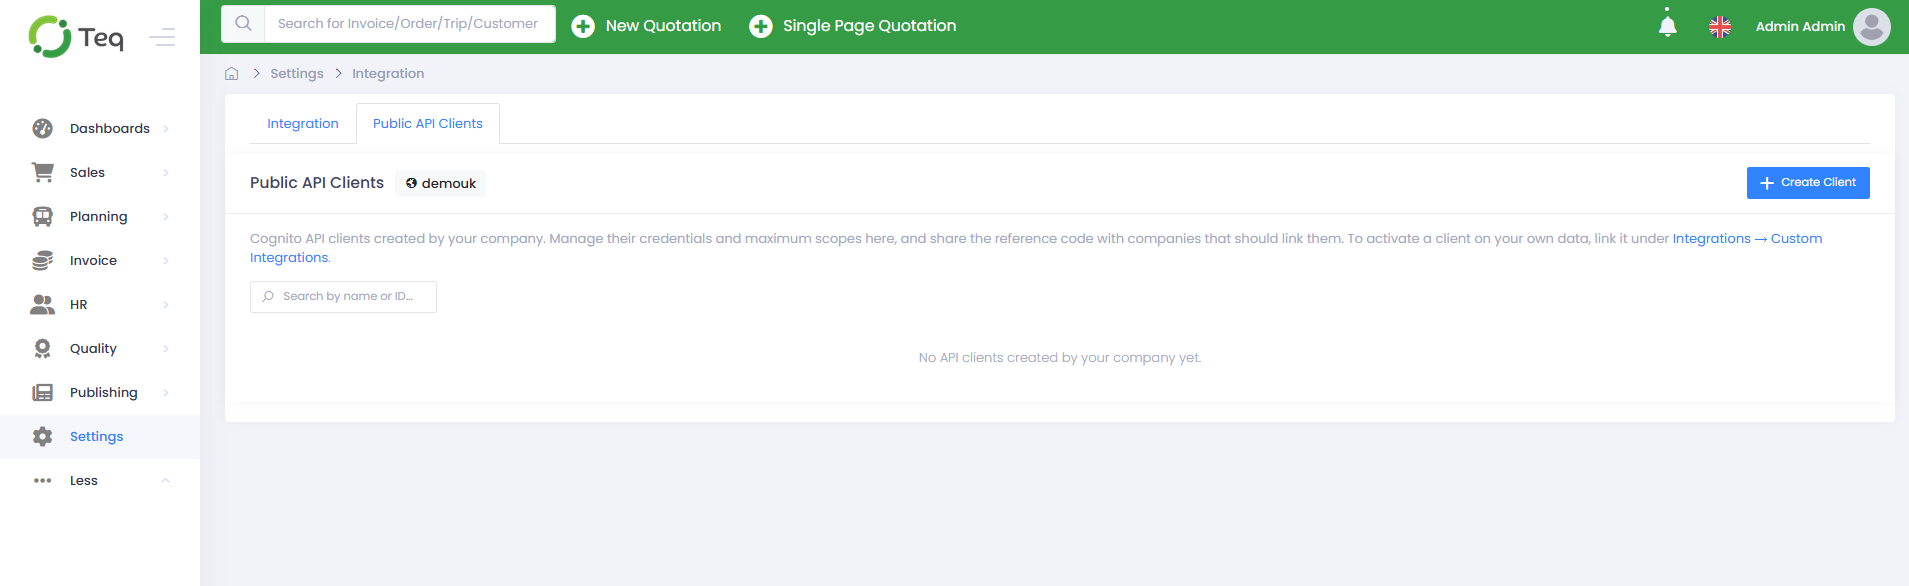
The client is created in the TEQ company (instance) shown next to the Public API Clients heading.
⚠️ Warning: Creating a client does not give it access to any company’s data. Every company the client will access, including your own, must link it first.
Create the client
- Click Settings in the sidebar.
- Click Integration.
- Open the Public API Clients tab.
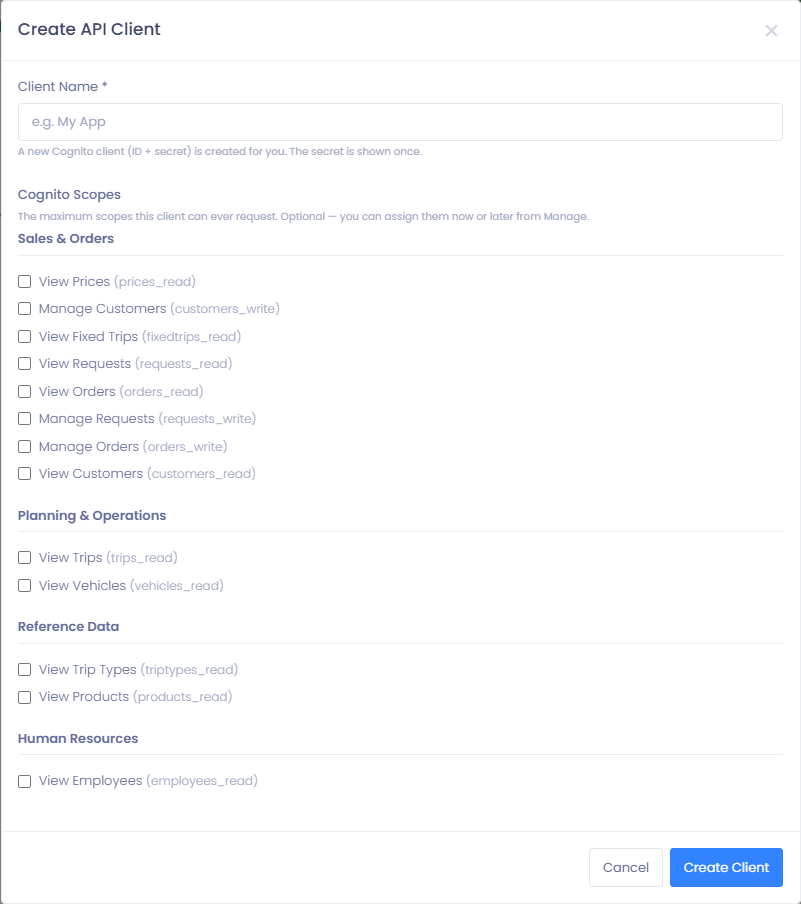
- Click + Create Client. The Create API Client dialog opens.
- Enter a name in Client Name. This field is required.
- Select the scopes the client needs under Cognito Scopes. This step is optional. You can also add scopes later (see Change the scopes of an existing client).
- Click Create Client. TEQ shows the generated Client ID and Client Secret.
- Copy both values and store them in a secure place.
- Check I have copied the secret. The Done button stays disabled until you do.
- Click Done.
❌ Do not click Done before you have copied the Client Secret. TEQ shows it only once and cannot show it again.
Choose scopes
Scopes define which parts of the API the client can use. The scopes you select are the maximum the client can ever request. Companies that link the client can grant at most this set on their own data.
⚠️ Warning: Select only the scopes your application needs. Do not select extra scopes for later use.
💡 The list of scopes grows over time. See the API documentation at https://developer.ferdia.co for the current scopes and the endpoints each one covers.
The Cognito Scopes column in the client list shows how many scopes are selected for each client.
Change the scopes of an existing client
Use this to add or remove scopes after the client is created.
- Click Settings in the sidebar.
- Click Integration.
- Open the Public API Clients tab.
- Find the client in the list. You can search by name or ID.
- Click the gear icon under the Actions column. The manage page for the client opens.
- Check or uncheck scopes. The page shows Selected Cognito Scopes and Available in Registry at the top.
- Click Save.
- If you removed a scope, the dialog Remove permission(s) from this client? opens and lists the removed scopes. Click Yes, remove and save to confirm, or Cancel to stop.
- If you added a scope, the dialog Let your integration partner know opens. Click Understood.
⚠️ Warning: Removing a scope takes access away from every company that uses it. The partner’s connection may stop working until their system is updated, so inform your integration partner first.
⚠️ Warning: After you add a scope, the partner’s system may need a one-time update. Until then, requests for that data keep being denied.
Give the client access to company data
After you click Done, the client can authenticate to the Public API. It cannot read or change any company’s data until that company links it.
Each company that the client will access must link it, including your own company. The only value a company needs to link the client is the Client ID.
⚙️ Linking is done by the company that owns the data, not by the person who created the client.
The linking steps are covered in a separate article.
Troubleshooting
🔍 Check this first: If the client authenticates but cannot access any data, the company has not linked the client yet. Every company the client accesses, including your own, must link it.
- The Public API Clients tab or the + Create Client button is missing: your user role does not have access to both the Integrations and Public API Page features. Ask a TEQ administrator in your company to update the role.
- The Client Secret was lost: TEQ cannot show it again. Contact support at support@ferdia.no with the Client ID.
- A request is rejected for a specific endpoint: the client may not have the scope that endpoint requires. Check the required scope in the API documentation at https://developer.ferdia.co.
- A newly added scope does not work: the partner’s system may need a one-time update. Inform your integration partner.
- An integration stopped working after a scope was removed: the client no longer has that scope. Add the scope back under the gear icon in the Actions column, or update the partner’s system.
- Another company cannot link your client: confirm you gave them the Client ID. The Client Name does not work for linking.
Still having trouble?
Contact TEQ Support at support@ferdia.no with the Client ID and a screenshot of the Public API Clients tab for faster assistance. Never send the Client Secret.