
Five Ferdia features you could be getting more from
From reducing repetitive admin and improving pricing to making sure cancellation fees don’t slip through the cracks, these are five features already included in Ferdia that could help your team save time and get more from the platform:
- Reusable item templates
- Automatic trip assignment notifications to drivers when an assignment hasn’t been submitted
- Cancellation policies and automation
- Convenient Time pricing and other improvements to the price calculator
- For Guild of British Coach Operators members: a safety question in the customer survey covering information required for your audit
None of these is an upsell — they’re already included in your plan. Most take less than an hour to set up, and if you can’t see one in your menus, let us know and we’ll help you get it switched on.
We know that introducing new ways of working isn’t always a priority during the busiest months. As the season begins to wind down, now is a good time to explore what you could be getting more from.
If you do one thing in Ferdia this month, make it one of these five.
Ferdia: the new platform screen by screen
As shared in our Enablement sessions before the summer, we’re building a new frontend for Ferdia. As the new experience begins to roll out, we’re simplifying the product name too: TEQ will gradually be phased out. The platform is Ferdia.
The first new screens cover the workflow from enquiry to order, along with resource lists and settings. Planning is currently in design and user testing, with more screens to follow as we roll out the new experience step by step.
Your existing screens will remain available during the transition, so your team won’t need to change everything at once. As part of the platform upgrade, we’re also introducing a new map and routing service designed specifically for commercial vehicles.
Still using Ferdia Driver? Move to CoDriver
CoDriver connects drivers directly to the operation, giving them the information they need throughout the working day while giving the office greater visibility of what’s happening on the road.
New functionality is being developed exclusively for CoDriver, including geofencing, greater visibility into the wider booking and the ability to show drivers trips before they are confirmed. The previous Ferdia Driver app will continue to work for now, but will no longer receive new features.
If you’re still using Ferdia Driver, now is a good time to make the move.
CoDriver is available in both the App Store and Google Play:
Download for iOS: App Store
Download for Android: Google Play
Before you switch: If your company has been using the previous Ferdia Driver app, there may be unfinished trip reports that need to be cleared before moving across. Contact us at support@ferdia.no before migrating, and we’ll help prepare your account for a smooth transition.
CoPlanner: Make more of the fleet you already have
CoPlanner helps your planners find better vehicle allocations across confirmed trips, taking into account vehicle availability and requirements, locations and driving time. Rather than manually working through every possible combination, planners can use CoPlanner to identify more efficient allocations, review the suggestions and stay in control of the final plan.
At Oslobuss, CoPlanner has helped reduce planning time by more than 50%, while helping the team find better combinations and reduce unnecessary driving.
With the quieter season ahead, now is a good time to see what CoPlanner could do for your operation. You can try it free for four weeks using your own trip data, alongside your normal planning workflow - giving your team the chance to test it in practice before deciding whether to continue.
Before you start: we switch CoPlanner on for your company and set it up with you. Your planners then need CoPlanner access on their role. The optimiser works from data you already maintain, so it is worth checking three things first: that your vehicles carry their capacity and equipment attributes, that your garages have coordinates, and that your vehicle types carry cost per hour, cost per km and a fixed cost per start. Where that is in place, setup is quick, and we'll walk you through each step.
Also shipped this year
Three ways to price more accurately
Every operator has quieter hours they would happily fill at a different price; the middle of a weekday, for example, after the school run and before the return, when coaches might otherwise be parked while drivers are already on shift.
The important question is which part of the price should change.
A job at one in the afternoon doesn’t necessarily cost less to operate than the same job at nine in the morning. The driver, fuel and vehicle costs are still there. What changes is the value of the capacity: during a quiet period, that coach might otherwise be sitting idle.
That’s where Convenient Time pricing comes in. It lets you define specific time windows and automatically adjust the price of trips that fit within them, without changing your standard hourly rate.
Set a window and a fixed adjustment, and any qualifying trip has that amount deducted automatically. Because your hourly rate remains unchanged, the discount doesn’t increase unexpectedly on a longer job, and your sales team doesn’t need to negotiate down the underlying rate.
There is one important distinction: the entire passenger-carrying part of the trip must fall within the Convenient Time window.
This differs from Inconvenient Time pricing, which can apply based on the amount of time that overlaps with a defined period. Convenient Time is all or nothing: the passenger-carrying part of the trip must start and finish within the window, on the same day, for the adjustment to apply.
Example
- Window: Monday–Friday, 12:00–16:00
- Adjustment: £50 off any qualifying trip
A transfer leaves the garage at 12:00, picks up passengers at 12:30 and drops them off at 15:00, before returning to the garage at 15:30. At a standard rate of £90 per hour plus a £150 fixed charge, the normal price would be £465. Because the passenger-carrying part of the trip falls entirely within the Convenient Time window, the £50 adjustment is applied automatically, bringing the price to £415.
If the passenger journey starts at 11:45 instead, the adjustment doesn’t apply because the trip no longer fits entirely within the defined window.
Because a fixed adjustment represents a larger proportion of the price on a shorter job, you can also choose to make the adjustment a percentage of the hourly rate if that better reflects how you want to price your available capacity.
How to set it up
Go to Settings → Price and Salary → Convenient Time, create your window and select “Include as Price Factor. Then go to Settings → Price and Salary → Dynamic Price Factors:
- Set Related To to “Convenient Time”
- Select your time window
- Choose Rate rather than Rate per Hour
- Enter the adjustment you want to apply
Your vehicle types need to be active for the rate to apply. It’s also worth setting a minimum price for each vehicle type, so a short off-peak job can’t be discounted below the amount you need to operate it profitably.
If Convenient Time isn’t available in your menu, contact Support and we’ll help you get access.
Waiting time that charges what waiting actually costs
A single hourly rate doesn’t always reflect the real cost of waiting. A short wait can end up overpriced, while a long wait may not cover the cost of keeping a vehicle and driver available.
You can now set different price bands for waiting time, so the amount charged better reflects the length of the wait. This applies to round trips with availability, where the vehicle waits between the outward and return journeys.
Example
You could set up three waiting-time bands:
- Up to 10 hours: £120
- 10–20 hours: £200
- 20–30 hours: £260
A day charter with 14 hours of waiting time between the outward and return journeys falls into the middle band, automatically adding £200 to the quote.
Because each band has a fixed price, a wait that increases from 11 to 14 hours remains at £200 rather than increasing hour by hour. If the waiting time falls outside all the bands you’ve created, Ferdia falls back to the factor’s standard flat rate.
The result is more consistent pricing, and waiting time that might previously have been absorbed by the business can now be reflected in the quote.
How to set it up
- Go to Settings → Price and Salary → Dynamic Price Factors.
- To access the waiting-time bands, set:
- Trip type: Round with Availability
- Related To: Waiting Time
- Leave the other criteria empty
- Unit: Rate rather than Percentage
The required role permission is “Price-Dynamic Price Factors Home.”
A minibus standing idle should not cost what a coach costs
The same waiting time doesn’t necessarily have the same cost across your fleet. Keeping a 16-seat minibus available for 15 hours is different from keeping a 59-seat coach available for the same period.
You can now set different waiting-time rates for different vehicle types, while keeping the same band structure across your fleet.
For example, the same 10–20 hour waiting band could be:
- 16-seat minibus: £140
- 59-seat coach: £200
You only need to configure the vehicle types that genuinely need different pricing. Any vehicle type without its own rate will continue to use the default rate from the underlying price factor.
This gives you more control over how waiting time is priced, without having to build a separate pricing structure for every vehicle type.
How to set it up
- First, create your waiting-time bands on the relevant price factor. Then go to Settings → Vehicles → Vehicle Type to set different rates for individual vehicle types.
- The override option only appears once the underlying price factor has waiting-time bands. If you remove an override, that vehicle type will automatically return to using the default rate.
The required role permission is “Vehicle-Vehicle Type Home.”
Cancellation fees that apply themselves
Most operators already have cancellation terms. The challenge is applying them consistently.
Charging a cancellation fee often means someone has to remember the terms, work out what is due and add the charge manually — usually while dealing with the cancellation itself. It’s easy for the fee to be missed or waived by default, leaving the operator to absorb the cost of capacity that was reserved but can no longer be sold.
With Cancellation Policies in Ferdia, you can set the rules once and have the correct fee calculated automatically when a trip is cancelled.
For example, you could set:
- 72 hours or more before departure: No fee
- 24–72 hours before departure: 50% of the trip price
- Less than 24 hours before departure: 100% of the trip price
Each stage can use either a percentage of the trip price or a fixed amount, so you can configure the policy to match the cancellation terms you already have.
When a trip is cancelled, Ferdia calculates the fee based on the trip’s departure time and replaces the original trip price with the cancellation charge. The trip remains in your invoice worklist rather than disappearing from the invoicing process.
The invoice also shows when the cancellation was received, which rule was applied and the resulting charge, giving both your team and the customer a clear breakdown of how the fee was calculated.
You still have the final say. Because the cancellation fee is applied to the trip price, you can reduce it or waive it entirely when you choose to. The difference is that waiving the fee becomes a deliberate decision, rather than something that happens because the charge was never applied.
Policies can be assigned to individual customers, applied in bulk by customer category or set as the default for all customers. You can also change the cancellation policy for an individual order when needed.
How to set it up
Go to Settings → Company → Cancellation Policies and create the policy that reflects your standard cancellation terms.
Creating a policy alone won’t activate it. It must also be assigned to customers, applied to an individual order, or set as the default and configured to apply to all customers.
Before activating it, make sure the policy matches the cancellation terms you communicate to your customers.
Your role needs access to Settings → Company → Cancellation Policies.
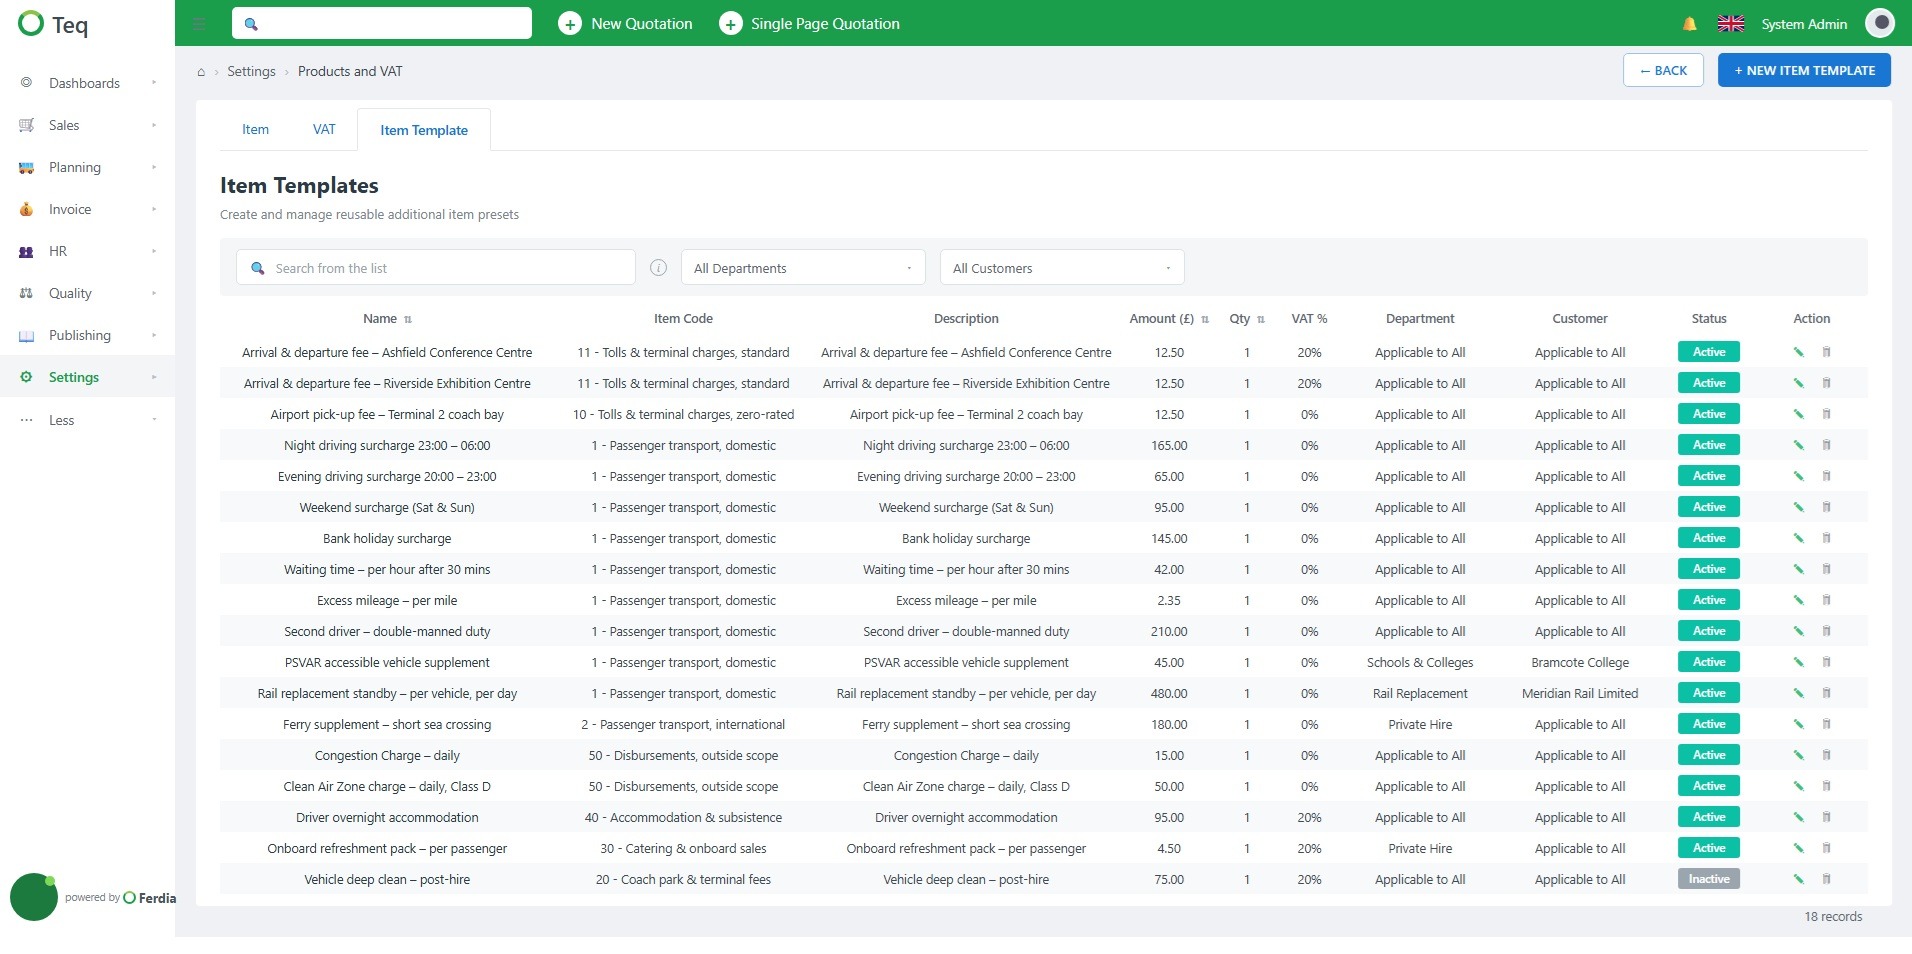
Item templates: stop retyping the same extras
Road fees, luggage handling, guide fees and other common extras can now be saved as Item Templates in Ferdia.
Create each item once with its name, description and price, then add it to an order from Additional Items using “From Template”, instead of entering the same information every time.
Templates can also be linked to a specific department or customer, so individual depots or key accounts can have their own lists. Only active templates will appear when adding items to an order.
The benefit goes beyond saving a few keystrokes. Extras that have to be entered manually are easier to forget, and an extra that never makes it onto the order never makes it onto the invoice. Using templates also helps keep pricing consistent, regardless of who takes the booking.
How to set it up
- Before creating a template, make sure at least one item exists under Settings → Products and VAT → Item, as every template needs an item code.
- Then go to Settings → Products and VAT → Item Template to create and manage your templates.
Your role needs Item Template access under Settings → Products and VAT.
Coming next: The ability to apply items while creating a trip is planned for a future release.
Catch an expiring licence before the trip is assigned
An expired driving licence is something you want to catch before a driver is assigned to a trip, not afterwards.
Record a driver’s licence number and expiry date on their employee card, and Ferdia will track the status wherever it matters in the planning workflow:
- Green: Licence is valid
- Amber: Expires within 30 days
- Red: Licence has expired
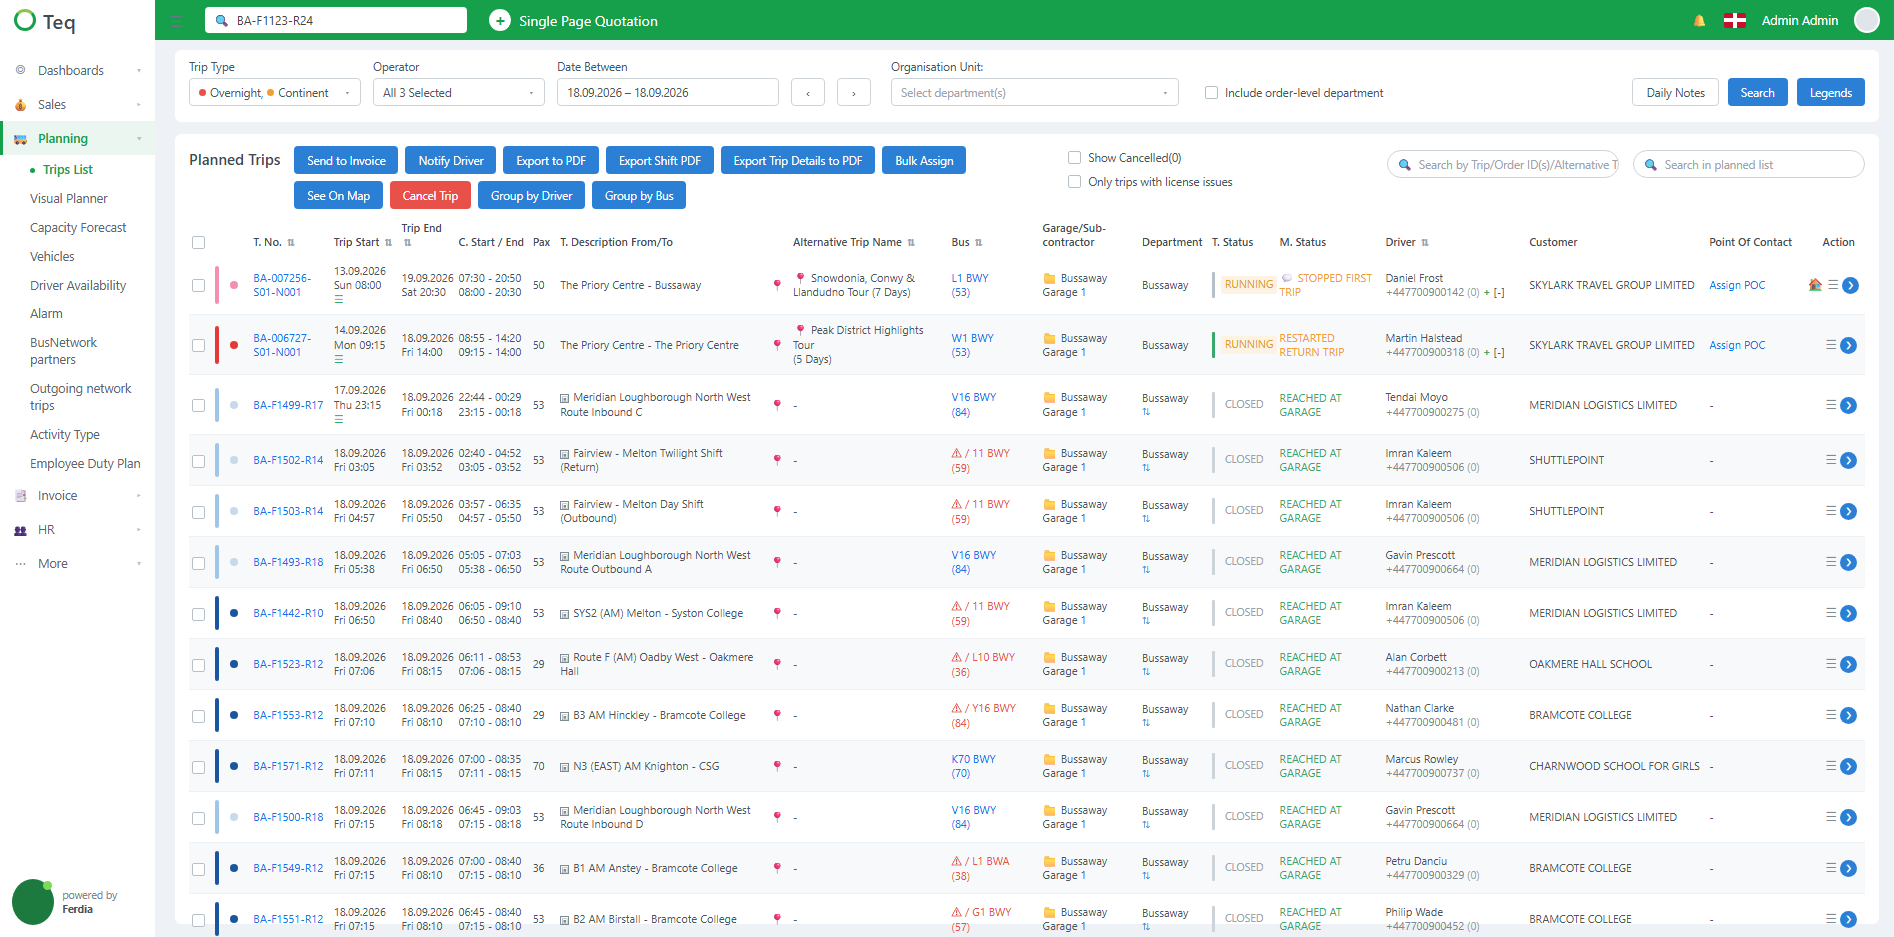
In the trip list, a warning appears on any trip assigned to a driver with an expired or soon-to-expire licence. Hover over the warning to see the exact expiry date, or filter the trip list to show only trips with licence issues.
The same status colours appear alongside drivers in the Visual Planner. If you try to assign a trip to a driver whose licence will not be valid when the trip starts, Ferdia will warn you and ask you to confirm before continuing.
What makes the difference is where the warning appears: directly in the planner’s workflow, when there is still time to act, rather than after the assignment has been made.
How to set it up
- Go to the driver’s employee card and add their licence number and expiry date under Certificates and Contracts.
The expiry date is required and must be in the future when the licence is first saved. If “Driver License” isn’t available among your certificate types, contact Support and we’ll add it for you.
There’s no separate permission for licence tracking. Anyone who can access an employee card can record the licence details, while the warnings are visible to users with access to the trip list or Visual Planner.
Coming next: Licence category and issuing authority tracking are planned for a future release.
See what kind of work each trip is, at a glance
See what kind of work each trip is, at a glance
Running school services, private hire, charters or a mix of different work? You can now create your own trip categories, assign each one a colour and see them directly in the trip list.
This gives planners a quick visual overview of the work scheduled — without having to open individual trips to see what they are.
How to set it up
- First, go to Settings → Company Settings and switch on “Enable Trip Type.”
- Then go to Settings → Admin → Trip Type to create your categories. Each trip type needs a unique name and its own colour.
Until “Enable Trip Type” is switched on, the colours won’t appear in the trip list.
The required role permissions are “Company Settings” to enable the feature and “Trip Type” to manage your categories.
Guild members: the safety question your audit asks for
If you’re a member of the Guild of British Coach Operators, your customer survey can now include the safety announcement question requested by Guild members to capture information required for the audit.
The question asks:
“Did the driver advise of emergency procedures, the location of exits and the use of seat belts?”
Customers can answer Yes, No or Don’t remember, giving you a consistent way to capture this feedback after each trip.
How to set it up
- Go to Settings → Company Settings and switch on “Enable safety announcement survey question.”
The question will then appear in the “During the trip” section of customer surveys sent from that point onwards. For it to appear:
- The “During the trip” section must be active
- Customer feedback emails must be enabled for the relevant customers
- The required role permission is “Company Settings.”
- Please note: The setting and survey question are currently displayed in English across all language versions.
See which weeks your fleet cannot cover, months ahead
Capacity Forecast gives you an early view of where demand is building up, and where you still have capacity to sell.
Found under the Planning menu, it shows how many trips overlap within a period you choose. View capacity by hour, by day or using your own interval, and filter by department, trip status and time of day to focus on the parts of the operation that matter most.
Each bar separates confirmed trips from quoted and requested trips, so you can see committed demand alongside potential future demand rather than having everything combined into a single number.
The real value is seeing pressure before it reaches the planning desk. You can identify periods where demand is building beyond what your fleet can comfortably cover — and quieter weeks where there may still be capacity worth selling.
How to get started
- Capacity Forecast needs to be enabled for your company first. Once enabled, your administrator can give the relevant roles access through the “Demand Analysis” permission.
If you want to filter the forecast by department, your departments also need to be configured in Ferdia.
Integrations: quicker to connect, starting with Xero
We’ve rebuilt the foundation behind Ferdia’s integrations, making it easier to connect Ferdia with the other systems you use to run your business.
Xero is the first accounting integration built on the new foundation, alongside integrations with Tripletex and Visma eAccounting. And if you use an accounting, fleet or other business system that isn’t connected to Ferdia today, let us know; it may be easier to add than previously, or we might already have it planned.
Xero
Invoices can now sync automatically from Ferdia to Xero as authorised invoices, while advance invoices arrive already marked as paid. Payments are matched to the amount actually received, and duplicate payment notifications won’t create duplicate entries.
The result is less double entry for your finance team and less manual reconciliation between Ferdia and Xero.
Already using the Xero integration? Your existing connection carries over, but Xero now requires additional permissions for Ferdia to create invoices and payments.
Before your next invoice run, go to Settings → Integrations, disconnect Xero and reconnect it once to grant the new permissions.
The required role permission is “Integrations.”
Please check out our user guide in the Help Center for additional details.
Tripletex
Accounting data can now transfer automatically from Ferdia to Tripletex, following the same flow already available to Fortnox users.
Ferdia sends completed sales invoices and credit notes to Tripletex together with the relevant customer information. If the customer doesn’t already exist in Tripletex, the customer record is created automatically, with VAT matched to your Tripletex VAT types.
Your existing account mappings and payment registrations remain unchanged.
How to get started
We’ll set up the connection from the Ferdia side. You then add your Tripletex employee token under Settings → Integrations.
Tripletex can also send the invoice directly to your customer. This is switched off by default and can be enabled on request.
The required role permission is “Integrations.”
Please check out our user guide in the Help Center for additional details.
Best wishes,
Anders and Eirik from the Ferdia team